It has been quite a long time since my last post. Work has been slow going on the project for sure but when time and motivation allowed, I was plugging away on fiberglass repairs.
HOLE UNDER DRIVER SEAT
The first job I tackled was the hole under the drivers seat and its shoddy repair sometime in the past...
The general idea is to do a full thickness repair involving these steps...
- Dish out each side of the panel with a sanding disc. Lungs and eyes don't appreciate fiberglass dust so I was sure to wear proper protection. Skin doesn't like it either... I covered up the best I could, but it was still a very itchy job!
- Wipe down the area with wax/grease remover and dry with compressed air
- Prepare fiberglass mat patches that you plan to use
- Mix up the fiberglass resin and hardener according to instructions. Be prepared at this point to work fast as it will harden quickly. I learned the hard way to be prepared with enough fiberglass mat pieces ahead of time. It is tough to pull off fresh pieces of the mat when you already have resin all over your fingers, etc.
- Dab some resin on the area to be patched with a brush. I used cheap wood brushes that I just disposed of after a patch job.
- Apply a piece of fiberglass mat and dab it on with more resin.
- Keep repeating with the number of fiberglass mat pieces you see fit to use. I tended to use 5-7 pieces on each side of the repair.
- Let the area completely dry and harden. I waited at least 24 hours before doing the other side of the repair in the same manner as above.
Supplies I used for the job are pictured below. That fiberglass mat box used to be full to the top, so you can see how much fiberglass work I've been up to!
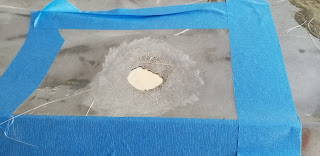
Some pics of the area during and after the work are below. For a hole like this, I used cardboard lined with aluminum foil as a backer for the initial repair... you can see this in one of the pics below. The resin won't stick to the aluminum foil and you can just peel off the backer when the patch work has hardened. Once both sides of the repair have completely hardened, they can be sanded down to blend in the repair with the surrounding original fiberglass.... although this initial repair will never be seen so I wasn't too concerned with that here.
TAIL LIGHT PANEL
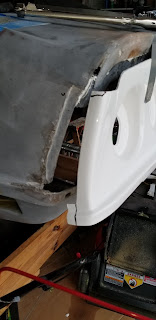
The next job I tackled was the tail light panel. When the paint was removed, it became obvious that my corvette suffered a rear end accident at some point in its life. The tail light panel was so badly damaged that I decided to replace it with an aftermarket piece.
damaged panel...
First I rough cut out the tail panel, and then used a heat gun and painters tool to pry off the remainder from the body and bonding strip....
Once this was removed, damage to the bonding strip was noticed as well. I decided to remove and repair the bonding strip instead of buying a new one. The damage in the left rear was up the rear deck as well. This area was repaired before reattaching the bonding strip.
With the repairs to the bonding strip and left rear deck completed, the bonding strip was reattached to the body with Lord Fusor 127EZ adhesive. This needs a special gun and applicator tip to apply, but with lots of fiberglass repairs on my to do list, the necessary items were purchased and I got to work. Several clamps were used to hold it in place while the adhesive cured.
With the bonding strip back in place, the new tail light panel was fit to the car. It needed some trimming which I did with a die grinder. It was then bonded to the car in the same manner as the bonding strip and clamped down with several bolts and fender washers. Where the new tail light panel merges with the car will have to be extensively body worked, but going to postpone that until later so I can just focus on major fiberglass repairs.
I decided to do away with the rear antenna and patched this hole as well while working in the back of the car. Rear wheel wells needed some tender loving care as well...
FRONT VALENCE AND LH FRONT WHEEL WELL
The front of the car had even more damage than the rear. I ended up scrapping the front valence for a new one and bonded it to the car in the same manner as above. The left front wheel well also had damage...
damaged areas...
To be able to access the inside of the body for a full thickness repair, unfortunately I had to cut out some of the wheel well. You can also see a new bonding strip clamped in place as prep for the new front valence which got installed soon after...
the left front wheel well piece glassed back in place and bonded to the inside of the body...
The left front wheel well repair...
OTHER REPAIRS...
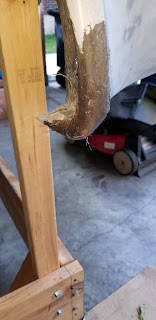
There were lots of other smaller repairs as well, but the most noteworthy would be the area pictured below that is just under the left front side grille. It was mostly missing altogether. I made a mold out of cardboard using the right hand side as a guide, hand formed a replacement, and glassed it in...
This brings the blog and car work up to date as of now. I believe I have completed all of the fiberglass repairs that need to be done before putting the body back on the chassis, namely areas that can't be accessed with the chassis in the way. At this point, my plan for the sequence of the remaining car work is the following...
- paint under body, apply truck bed liner to wheel wells
- rebuild engine, dyno it, and install back onto the chassis. Machine shop has block, crank, and connecting rods right now to get magnafluxed and checked out.
- install new 5 speed transmission and drive shaft
- install new exhaust and parking brake
- reattach body to chassis
- new wiring harness, connect fuel lines and brake lines
- complete exterior fiberglass work
- body work and paint
- interior
- get her back on the road!


